It’s important to perform routine inspections of your roof. Look for sagging, musty odors, water stains and peeling paint. Also, check the base flashing and vent pipe collars in your attic for leaks and damage.
Roof repair fixes components like shingles, ventilation, and flashing that leak or otherwise fail. It usually extends the life of a roof. Visit Website to learn more.
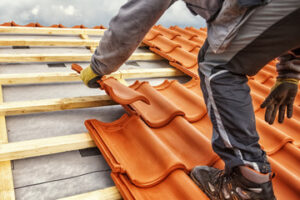
Shingles are the outer layer of your roof that protects against rain, snow and the sun’s damaging UV rays. If a shingle is damaged, it should be replaced as soon as possible to prevent moisture from penetrating your roof and causing leaks, rot or mold. This is an easy, inexpensive repair that’s well worth the effort.
Start by locating the damaged shingle. Then, check that the shingles surrounding it are secure and intact. If they’re loose or cracked, use a caulking gun loaded with roofing sealant to fill the cracks. For a more cosmetic solution, scrape granules from the old shingle and mix them with the sealant to cover the repaired area.
Next, examine the shingle’s nails. If the nails are raised up and sticking out of the roof structure, the shingle is probably rotten and should be replaced. If the shingles aren’t rotten, but are loose, you can usually fix them by applying roof cement with a putty knife.
To replace a 3-tab shingle, first remove the second row of shingles above it. This exposes the nails beneath, which you can use to release the shingle and pull it off with your hammer claw. Then, slide a replacement 3-tab shingle into place and nail it down with 4 roofing nails. Be sure to use a tool belt to keep small tools within reach and prevent them from sliding down the roof as you work.
If the shingle you’re replacing is a bit different in color from the rest, try using a bit of roofing tar to hide the patch. Or, check the gutters for a build-up of colored granules that washed down from the roof and gather some into a cup to sprinkle over the sealant on the repaired shingle to camouflage it.
When you’ve finished repairing the damage on your roof, take the time to pick up any nails or shingle pieces and dispose of them properly. Then, take a walk around your roof and inspect the shingles for any other damage that needs to be addressed. An ounce of prevention is always worth the effort.
Flashing
Flashing is the material that seals the intersections of roof features such as chimneys and vents. It’s important to regularly inspect and repair flashing to ensure a watertight seal, as moisture infiltration can cause ceiling damage, rot, mold growth, and even structural damage.
When it comes to repairing flashing, it’s critical that you work with an experienced roofer. Attempting to repair flashing yourself could lead to leaks that can damage your home’s interior and compromise its safety and value.
Leaks due to flashing problems can be particularly difficult to spot since the flashing itself is typically concealed under shingles. A professional can inspect your roof and look for signs of leaks, such as lifted shingles, to locate the source of the problem.
In addition to identifying leaks, a professional roofer will also inspect the flashing’s condition and determine whether it can be repaired or must be replaced. Generally, flashing is designed to be a two-part system: base or apron flashing covers the bottom of the feature and counter flashing is installed across from it. This design allows the flashing to expand and contract as the roof materials change, which prevents the seams from leaking.
Flashing can be fabricated from aluminum, copper, or steel and comes in a variety of thicknesses and sizes. It’s important to choose the right type of flashing for the specific roof material. Copper, for example, is more durable than aluminum and can withstand high temperatures.
Regardless of the type of flashing you choose, it’s crucial that you follow manufacturer instructions for installation and best practices for overlap and sealant application to achieve an optimal level of protection against moisture infiltration. Properly installed flashing can significantly extend the lifespan of your roof and reduce costly water-related repairs.
Although many roofers recommend replacing flashing during a re-roofing project, this isn’t always necessary. For instance, if the flashing is still in good condition, it may be possible to repair the existing section with a caulking gun and patch kit. However, if the flashing is damaged beyond repair, it’s best to replace it.
Built-up roofing (BUR)
If you’ve ever watched roofers spreading a gooey black substance on a flat or low-slope commercial roof, then you’ve likely been witnessing the creation of a built-up roofing (BUR) system. BUR has been in widespread use since the 1840s and is one of the most durable, time-tested types of commercial roofing systems available. These types of flat or low-slope roofs are typically made from a combination of felts, fabrics, mats, and bitumen and are best known for their superior waterproofing and ability to resist heavy traffic.
The BUR installation process requires a thorough site preparation to ensure the longevity of the system, which is why many building owners opt for professional roofers for the work. BUR systems are a great choice for a wide range of environments and climates, as the flexibility of these roofs allows them to withstand the elements without compromising structural integrity.
In addition to their waterproofing capabilities, BUR systems also provide insulation and fire resistance. Many of these systems are tested by Factory Mutual and Underwriter’s Laboratories to meet high fire-classification standards as well as zoned wind uplift resistance requirements. The insulation component of a BUR system can help regulate temperature and improve energy efficiency in a building.
As with any roof, it is important to perform regular inspections and maintenance on a BUR roof to keep it in good condition. Performing routine repairs and addressing any minor issues promptly can prevent damage, leaks, or water pooling that could lead to costly replacements down the road.
During these inspections, it is important to look for any cracks or holes in the BUR membrane, as well as any signs of moisture intrusion. If you do notice any issues with your BUR system, it is advisable to contact a commercial roofing contractor for prompt repair.
BUR roofs require a great deal of redundancy, which is why it’s so important to perform regular inspections and maintenance on these types of roofs. Depending on the amount of wear and tear that your commercial roof experiences, you may need to replace parts of your BUR system or even entire sections of the roofing structure.
Metal
Metal roofs are a durable roofing material that provides an effective layer of protection for your home. However, like all roofing materials, they need regular maintenance to prevent damage and leaks. If you notice a leak, it is important to find the source of the leak and repair it promptly to prevent interior damage and mold growth.
The most common cause of a leaking metal roof is when screws are not installed properly. Screws must be inserted into the drilled hole at the correct angle, or they will back out and create a path for water to enter your home. If a screw has backed out, it is a good idea to use a screw gun to tighten it to help seal the hole.
Another common cause of a leak is when the metal roofing panel has been damaged. A damaged panel may become rusted or dented, which causes a hole in the roof. To repair a metal roof, first remove the screws or fasteners holding the damaged panel in place. Next, clean the affected area with Simple Green or other cleaner until all dirt, film, and algae growth is removed. Then, use a wire brush to scuff the surface of the metal panel in the area where you will be patching. Scuffing the surface of the metal will improve the bond of the sealant used in your roof repair project.
Finally, replace the damaged panel with a new piece of galvanized metal. Make sure the piece of metal is the same length as the damaged panel and a few inches longer on both sides. Also, apply two-inch butyl tape to the bottom “long” edges of the new sheet metal. These edges will slide under the J-rail on both sides of the damaged panel.
The best way to protect your investment in a metal roof is to perform routine maintenance and to have it professionally repaired if needed. By completing these basic repairs, you can extend the life of your roof and ensure that your family is protected from rain and hail.